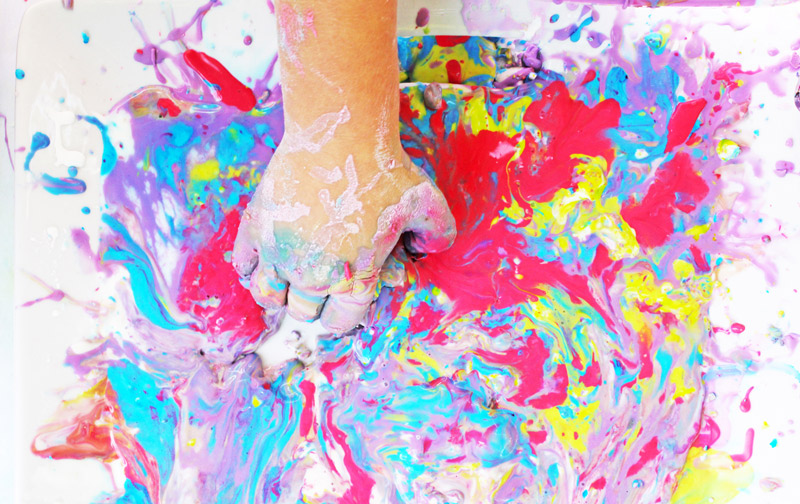
This project is very popular on the internet and I can see why. The combination of milk, dish soap, and food coloring makes for some color swirling magic! You can even dip paper in the milk to make a milk “print” to keep! See how we did it here.
The basic recipe for this is originally from The Usborne Big Book of Science Things to Make and Do, a book I highly recommend you have in your library, there are many more fun ideas like this one! We added a rainbow twist to ours.
Fill the jar halfway with vinegar, then add a few drops of one color of liquid watercolor/food coloring and some glitter. Squeeze in some dish soap, stir, and place the jar on a tray. Now have your child add in a heaping teaspoon of baking soda, stir again, and watch the foaming begin! The soap makes it foam rather than fizz. To keep the reaction going continue adding baking soda and vinegar when the foam starts to slow. To make it change colors, add a tablespoon of vinegar mixed with one color of liquid watercolor/food coloring every so often. Make sure to dump the colored vinegar into the center of the brew.
Tip:Stir It! My kids discovered that the more they stirred the mixture the faster and crazier the reaction! Did you hear the screams of delight in the video?
Pictured from left: Nature Shadow Boxes, Pinecone BirdFeeders, Magnetic Boxes
This was one of our school year’s all time favorites for parents and kids alike. Check out this post for the full directions! It will take a few days for the glue to dry but then the box can be hung on the wall like a picture!
These can be made with any number of “adhesives” meaning any type of nut butter or in this case Crisco! See our full tutorial here.
6. MAGNETIC BOXES
Fill a clear plastic container with metal objects. We used nuts and bolts, pipe cleaners, bobby pins, brads, and paper clips. Hand your child a strong magnet and let them experiment with lifting the objects in the container without touching them. It’s magnetic magic!
AKA slime made with cornstarch and water. This is so much fun, even for the parents! It is very messy so please do it outside or in an easily cleanable place in your home. Add colors to the mix for swirling magic!
8. BUTTERFLY FEEDERS
My kids love butterflies!
Supplies:
Small paper plate or plastic lid
Yarn
Over-ripe Fruit
Orange juice
Flowers
Tape
Instructions:
Punch holes near the edges of a small paper plate or plastic lid. Tie yarn through the holes (have your child feed the yarn through the holes for a fine motor skills bonus), then gather and tie the yarn at the top as if this is a hanging plant. Have your child pick some flowers and tape them to the yarn. Add a piece of fresh fruit in the middle of the plate, pour a little juice on top, and hang in a place where you can see it. Admittedly it rained the day after we made these at school and our poor feeder was pretty thrashed, so I never saw a butterfly actually visit it. But most of the fun is in the making!
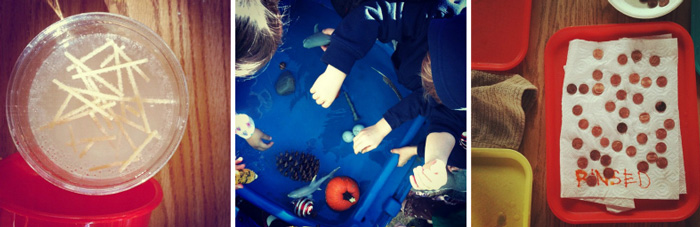
Pictured from left: Dancing Spaghetti, Floaters & Sinkers, Shiny Pennie
Super simple project you can do with a couple of items from your pantry. Mix water with baking soda in a clear glass or cup, and add a few small pieces of spaghetti to the mix. Then add vinegar. Bubbles will form on the spaghetti and make it “dance.” Additional instructions can be found here.
Another classic experiment. Fill a large bowl, kiddie pool, or water table with water. Collect a variety of objects that sink and float. Make sure to collect objects that are similar in size but vastly different in density, like a rock and a tennis ball. Ask your child to predict whether the object will sink or float and let them drop it in the water. Have your child classify them into two different stacks, the “Floaters” and the “Sinkers.” Sounds simple but trust me, it’s a hit with preschoolers!
11. SHINY PENNIES
This is a classic experiment and one that easily pleases preschoolers. Collect dirty tarnished pennies and have the kids soak them in a bowl of vinegar. Within a minute the pennies will be instantly “shined”. For an added bonus, rinse some of the pennies in water after the vinegar dip and then compare them to the vinegar only pennies; if you wait an hour the vinegar pennies will start to oxidize and turn green.
VARIATION: Experiment with other solutions to shine the pennies. You can try salsa (the acid in tomatoes also acts to clean the pennies), lemon juice, soap and water, and vinegar and see which one works the best.
12. SEED STARTS Growing things is a very important lesson. I have done two variations on this project, one using cardboard egg cartons and the other using ziploc baggies. The ziplock bag yields the more interesting visual results and the egg carton version makes plants that are much easier to transfer to soil down the road.
ZIPLOC VERSION: For the ziploc version buy a variety of seeds, beans and corn work well since they are large and easy to pick up. Give your child a folded wet paper towel and have them drop a small amount of seeds on it. Try to leave some space between the seeds if you actually want to plant them, otherwise the roots will tangle. Place the paper towel in a small ziploc bag and hang the bag in a sunny window or outside in a sunny spot. Within a few days the seeds will germinate and the roots will be visible.
EGG CARTON VERSION: To do the egg carton version fill a cardboard egg carton with potting soil, wet the soil, and have you child place a seed or two in each egg compartment. Place the egg carton on a cookie sheet either indoors in a sunny spot or outside. If you place it outside it may get cold for the seeds at night depending on where you live so I placed some wax paper over the carton during the day to create a hothouse effect that encourages germination. Make sure you spray or lightly water the seeds on a daily basis as it is easy for them to dry out. When the plants have started to sprout you can break off the section of the egg carton and place it directly in the soil!
13. MARBLE RUN
Another favorite by all! Don’t throw away your paper towel and toilet paper rolls. Cut them in half and let your child decorate them with markers or stickers. Then tape them to a large piece of cardboard or a wall or foam core using painter’s tape. Have your child determine where each track piece should go. Let them drop a marble down the run so they can see why certain spots/angles work better than others. The painter’s tape allows for easy adjustment. We used duct tape once the entire run was complete to secure the run in a more permanent fashion.
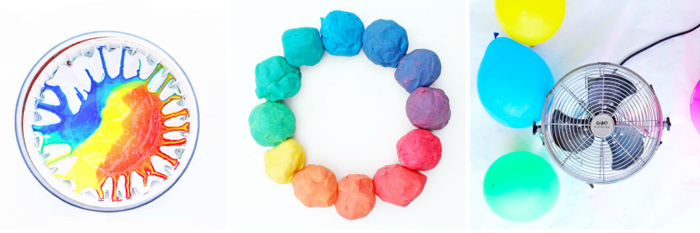
Pictured from left: Spin Mixing, Color Wheel Playdough, and Dancing Balloons
14. COLOR MIXING
There are so many variations of color mixing projects and kids seem to love every one. Here are three ideas to try:
Magic Colors! Pour water into three large bowls, then add blue, red, and yellow food coloring to one bowl each. Have an additional color mixing bowl available for your childand a dumping bowl. Give your child two plastic cups and let them experiment with taking a cupful of water from two of the primary colors and pouring them in the mixing bowl. Because the new color appears almost instantly it seems like a magic trick! Dump the third color in the dumping bowl and repeat the experiment. Using light colored or glass bowls makes the new colors more visible.
This is a fun interactive project that illustrates the idea of a vortex. And let’s be honest, what preschooler can resist balloons that hover mid air? Project and video available here.
16. WORM INVESTIGATION
It’s no secret; I love worm bins. They are fun for kids and make rich compost. We took some worms out of the worm bin at school one day, placed them in a pile of dirt in plastic tubs, and gave the kids magnifying glasses and tongue depressors to help them observe the worms (use the depressors to gently lift the worms out of the soil- fingers work too!). Then at snack we saved all our green waste and “fed” it to the worms back at the bin. If you don’t have a worm bin you can collect some earthworms and do a similar investigation. I find wetting the soil in a nice shady area in your yard usually bring a few worms to the surface.
Pictured from left: Layered Liquids, Smelly Game, Chia Pet
This will be either a hit or a miss in your house depending on if your child can stomach a variety of smells. Yes, there are some stinkers but also some sweet ones. It’s fun to think of things to put in the jars. An alternative is to use yogurt cups covered with a lightweight cloth or with holes poked in the lid. Then you can use actual objects in the containers instead of smells in a liquid form. Printable template and instructions here.
Fuzzy is still sitting on my kitchen counter! This activity requires parent involvement, it’s a little tricky for preschoolers, but they will love watching their “pet” grow. Details for making your pet are here.
Kids love scavenger hunts. Period. If you take the time to set up one related to a specific idea it can be a learning exercise. Since preschoolers for the most part can’t read, I create visual lists with images pulled off the web. For a recycling themed scavenger hunt I divided up items into three categories: compostables, recyclables, and trash. Then I hid these items around the school and gave each child one of the lists attached here: Recycling Scavenger Hunt Sheets. They had a blast finding the items. I re-hid them quite often so they could repeat the hunt.
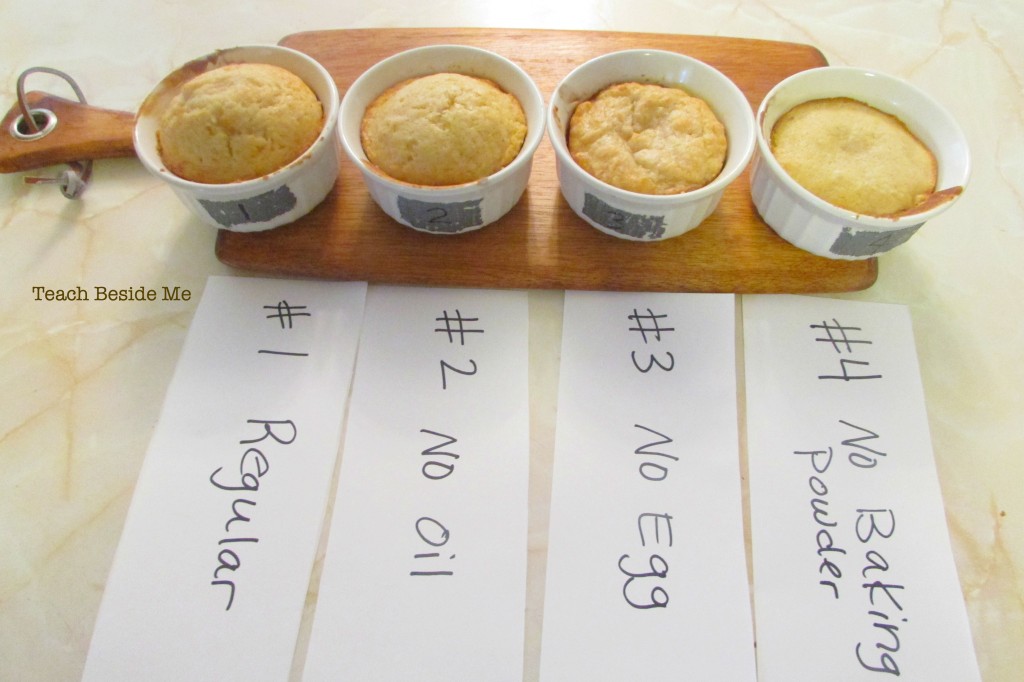
You’ll need to measure and mix this set of ingredients four times to complete all four experiments.
6 tablespoons flour
3 tablespoons sugar
1 pinch of salt
2 or 3 pinches of baking powder
2 tablespoons milk
2 tablespoons cooking oil
¼ teaspoon vanilla
⅓ of an egg (Break egg into a cup; beat until mixed, then use approximately one third of it. Save the rest for 2 of the other cakes.
Mix the dry ingredients, then add the wet ingredients in the order listed. Mix well and pour into prepared dish. Bake at 350 for 15-20 minutes.
I prepared four ramekin dishes by labeling them with a piece of duct tape and a sharpie marker with numbers 1-4. Mix the batter for each cake individually so you can leave out the proper ingredient each time for the experiment. Label the first cake #1 and make it with all of the ingredients.
Then, go on to bake three more cakes, but with the following differences:
For cake # 2, leave the oil out.
For cake #3, leave the egg out.
For cake #4, leave the baking powder out.
After the cakes are cooled, remove them from the pans and cut them in half. Observe the differences in size, texture, appearance, etc. They are all edible, so you an taste each one and see which tastes the best. Discuss why each cake is different and what the purpose is of each ingredient in the cake.
The purpose of eggs in a cake: Eggs add structure, richness, leavening, color and flavor to baked products. Eggs become firm when heated, so it allows baked goods to add in structure. The fat in the eggs also adds a tenderness and richness to foods.
The purpose of oil in a cake: Oil is a fat. Fat in baked goods makes it more moist and tender after baked.
The purpose of baking powder in a cake: Baking powder is a leavened. This makes the cake rise. The more it rises, the more light and tender it will be when finished. The baking powder releases a carbon dioxide gas causing bubbling. The bubbling makes pockets of air causing the baked goods to expand.
Technically, you can learn this lesson with your average depressing old bag of microwave popcorn. But using a cob of popcorn and a paper bag adds a little bit of class to the whole operation. The experiment is simply done: cob, bag, microwave, and a hundred little starch fireworks.
Fun Quotient: Any kid knows food that has to explode before you eat it is the best food.
Lesson Taught: Lots, really. First, kids can learn that of the four types of common corn, only one kind—which is actually called Popcorn!—will pop, off the cob or otherwise (it’s the only one with a hull that’s just the perfect thickness for explosions). Popcorn explodes because each kernel has a perfect drop of water inside it. Your microwave quickly raises that water to the steaming point, and the pressure of the steam rips open the hull and inflates the starchy mush inside.
The likelihood that prehistoric monsters will be cloned from DNA stuck in amber is pretty slim. But this experiment is good way to get your little monster started down the path of manipulating nature in ways no man was ever meant to.
Fun Quotient: Stuffing slimies into jiggle-goop, then eating.
Lesson Learned: Amber is the gold of archeology. This experiment, where kids “fossilize” gummies in gelatin, helps parents explain how amber can preserve prehistoric creatures in ways more delicate than any other form of fossilization.
3. ROCK CANDY GEODES
Rock candy on a stick? You call that kid science? Let’s see some style! Combine chemistry and geology lessons at once and make delicious rock candy geodes, as shown by this video at How to Cook That.
Fun Quotient: Pretty edible rocks inside non-pretty edible rocks. Something for all tastes. Plus, lots of mashing and squishing.
Lesson Learned: Supersaturation! Rock candy forms because you’ve dissolved so much sugar into your water that it can’t really hold it all. So, the water evaporates, the sugar precipitates, and tiny crystals of sugar cling on to one another until you’ve got a delicious geode. It’s also a good way to study the non-edible kind of geode, where crystallization happens much the same—except with minerals dripping into the hollow space of a lava bubble over millions of years. Well, sorta the same.
Science has yet to prove that the earth’s core is not made up of gooey marshmallow crunchies. Take advantage of this shortcoming to teach your children about earth layers, via rice krispie treats.
Fun Quotient: Let’s see. Frosting, sprinkles, krispie treats, and a molten core that looks a little bit disgusting. The only thing missing to make it kid heaven is a giant trampoline to bounce on while you eat it.
Lesson Learned: A great way to show the proportions of our earth’s interior. And it offers some philosophy, too: In the grand scheme we’re only but a thin layer of frosting, and Mt. Everest is nothing but a sprinkle.
5. EAT A DANDELION
Thinkstock
Is that really science? Heck yeah! Finding out that weeds contain enough food substance to be made into a a delicious soup is quite a discovery.
Fun Quotient: Holy cow you can eat these? I specifically remember getting in trouble for eating things I found in our yard. This is a new birth of freedom.
Lesson Learned: Children learn plant anatomy (and how much of our diet is actually either a leaf, root, or seed), how food exists outside a grocery store, and how to ask Dad three times that he’s absolutely sure he hasn’t sprayed pesticide in the side yard yet.
Just because it’s something people have been doing for thousands of years doesn’t mean it won’t be a fresh, new concept to your kid.
Fun Quotient: Mess made via electric beater.
Bonus: Highly lickable.
Lesson Learned: Emulsion! You’ve whipped so many air bubbles into your cream that the fat globules are sticking together and forming tiny protective coverings over the air pockets. But what if you don’t add extra air and just knock all those fat globs around together? They start to clump into the delightful fat-spread we call butter.
This one might be slightly more fun to do for the kids before you do it with them. Because it will make them think your constant threats to go mental have finally become real. All you need is an apple, a nut, and some gum.
Fun Quotient: At first, not apparent. Why is Dad making me watch this candle burn in a dark room? But then, after you blow it out and pop the whole thing into your mouth, it will become their favorite sleepover staple.
Lesson Learned: First, in science you can’t assume anything. Second, nuts burn, because they are full of oil, which is fire food. Third, never trust the old man. He’s shifty.
You know how your eyes work? They work like Jell-O. And this experiment will prove it.
Fun Quotient: The laser pointer alone is enough to fulfill the fun criteria. Add knives and Jell-O, and you got yourself a party.
Lesson Learned: Jell-O has the awesome distinction of both allowing light to pass through, and having enough tiny solid bits inside to reflect the light. So you can see what path light (the laser) is taking when it hits the Jell-O. The more interesting shapes you cut your Jell-O into (concave and convex especially), the more different paths the light will take.
What does “fortified with iron” really mean? Are you really eating iron? Grab a magnet and some industrial strength cereal and find out.
Fun Quotient: Well, buying the chocolate kind of fortification is a good start. Plus there will be pulverizing.
Lesson Learned: We eat metal, the very same metal inside rocks and rusty gates. We have to, in fact, because our bodies don’t make it and we need it to carry oxygen through our blood. Also, a chance to learn that just because a sugary cereal boasts healthful looking additives on its box doesn’t make it healthy.
Matter is neither created nor destroyed; it’s just rearranged—in this case, from powder and liquid into puffy dollops of happy.
Fun Quotient: All the best of kitchen science: Boiling stuff, electric mixer-ing, greasing, powdering and slicing!
Lesson Learned: Molecules like to stay together. But when you use extreme heat to pull them apart, and then introduce a whole bunch of new molecules to the party, everyone has to find new buddies. The end result is often marshmallows.